Create a Virtual Sample
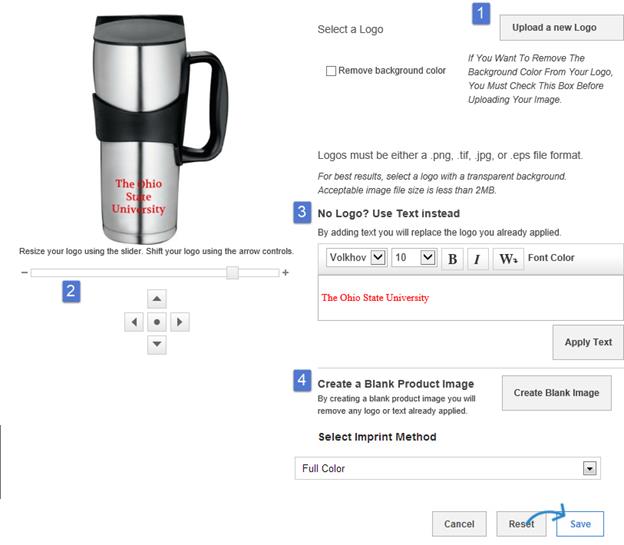
Creating a virtual sample of the product(s) is a way to visualize the product before ordering. Our site’s “create a virtual sample” functionality has several features for a user. Features include being able to view the logo to the product, manipulate the location of the logo, or add text to the product.
Creating a virtual sample does not upload your artwork for ordering purposes. Users must upload the artwork file(s) during checkout.
To create a virtual sample click the “create a virtual sample button” that will be located under the product image. This will open a new window for the virtual sample creator.

- Upload the logo using this feature. The logo will then be displayed on the product.
2. You can resize the logo by moving the slider to the left or right. You can also use the arrows to move the location of the logo.
Note: The image appears in the suggested imprint area. You may lose parts of the image if you move it outside the virtual boundary. The button with the dot will re-center your logo within the virtual boundaries.
3. If you don't have a logo or image, you can use the text field to add a company name or other identifier. The system allows you to select a font type, size, style and color. Click Apply to add the text, and it will appear on the product.
Note: Creating a virtual sample does not add text to your final product. When ordering your product there will be a field to add text.
4. To create a blank product image, just click on the "Create Blank Image" button. This will remove any logo or text that was already applied to the product by the supplier.
Click Save when you are finished.
Uploading Artwork at Checkout
Users may or may not have created a virtual sample of the product(s). Keep in mind that virtual samples are a way to visualize the product before ordering. Creating a virtual sample does not upload your artwork for ordering purposes. Users must upload the artwork file(s) during checkout. This is the only time the user will be able to upload artwork. This document will guide a user through this process.
- Once the user has selected all products click Checkout. Review Cart is the first step of the checkout process.
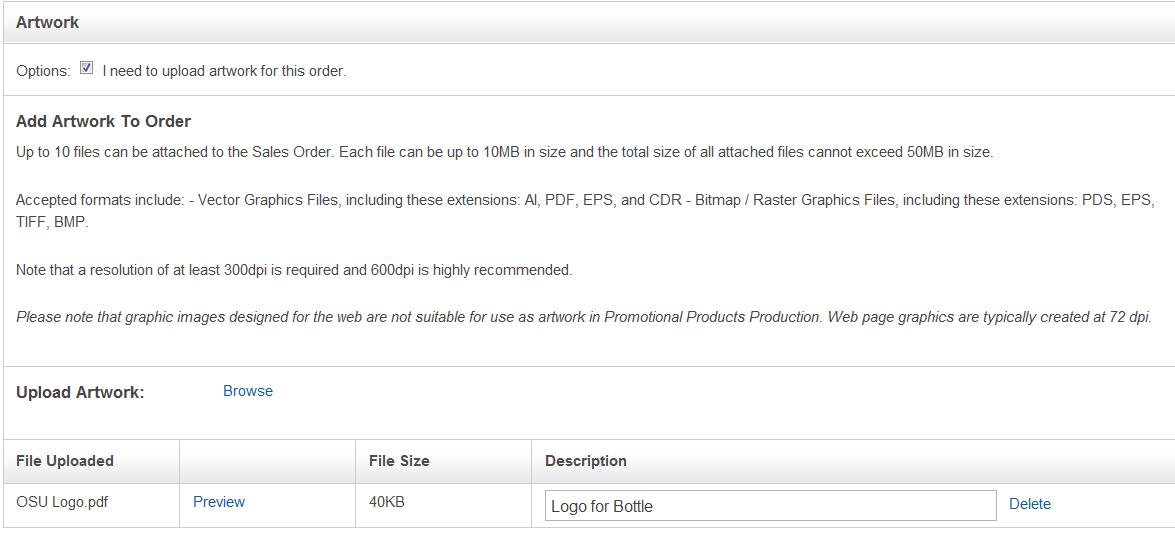
- On the Review Cart screen there are two sections to review. The “Shopping Cart View” shows the product the user selected and the “Artwork” section is where the user needs to upload artwork for the product(s) when necessary.
- In the Artwork section, click to check the box for “I need to upload artwork for this order.” This will expand the section to inform the user of artwork file requirements.
- Next, browse for the the artwork file(s) to upload. Upload artwork file.
- Add a description to the file. Description should specify which product and location (if applicable).
- Repeat steps 9 and 10 to upload all images for all products. This will be the only time to upload artwork for the order.
- Once the user has confirmed all products and artwork have been uploaded on the review cart screen click continue to complete your purchase.
